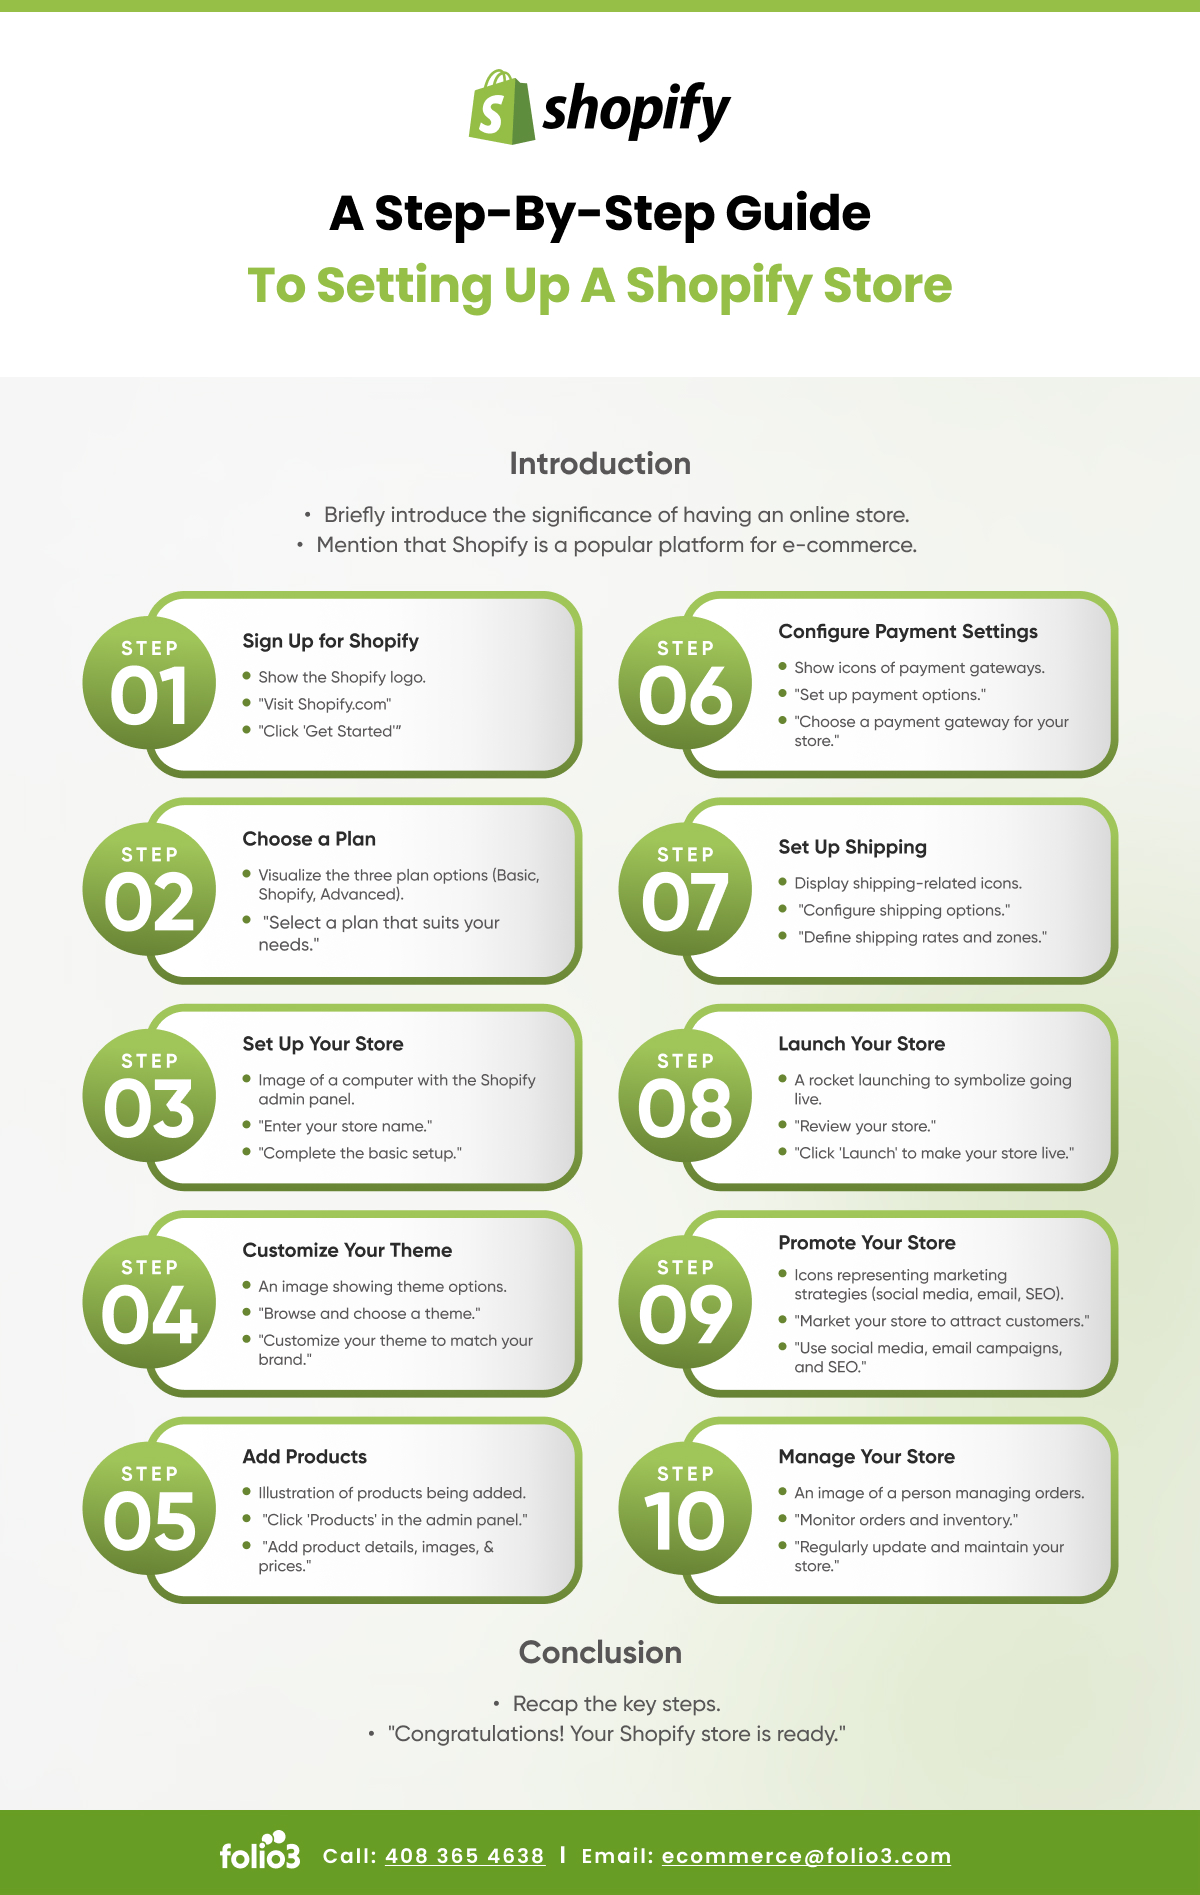
How to Launch your Shopify Store: A Step-by-Step Guide
To launch a Shopify store, create an account, choose a theme, add products, customize the design, and set up payment and shipping options. Starting a Shopify store involves account creation, theme selection, product addition, design customization, and payment and shipping setup.
Choose The Right Shopify Plan
When launching your Shopify store, choosing the right plan is crucial to the success of your online business. With a variety of options, it’s important to consider your budget and needs before selecting a plan. This article will guide you through the process of choosing the right Shopify plan that suits your business requirements.
Consider Your Budget And Needs
Before delving into the different Shopify plans, it’s important to assess your budget and the specific needs of your online store. Take into account the size of your business, the number of products you plan to sell, and the level of features and support required.
Compare Different Plans
Shopify offers various plans tailored to different business requirements. When comparing plans, consider factors such as transaction fees, credit card rates, available features, and level of customer support. Evaluating these aspects will help you make an informed decision about which plan aligns best with your budget and business goals.
Credit: www.amazon.com
Purchase A Domain Name
Launching your Shopify store is an exciting milestone, but before you can start selling your products or services, you need to purchase a domain name. Your domain name is the web address where shoppers will find your store, so it’s important to choose a memorable and relevant domain name that reflects your brand. Follow these steps to purchase a domain name for your Shopify store.
Choose A Memorable And Relevant Domain Name
The first step in purchasing a domain name for your Shopify store is to choose a memorable and relevant name. It should be something that is easy for shoppers to remember and type into their browser. Your domain name should also reflect your brand and give visitors an idea of what your store is about. Here are some tips for choosing a memorable and relevant domain name:
- Create a name that is short, simple, and easy to spell
- Incorporate keywords related to your industry or niche
- Avoid numbers and hyphens, as they can be confusing
- Consider using your business name or a variation of it
Register The Domain Through Shopify Or A Third-party Provider
Once you have chosen a domain name, you can register it through Shopify or a third-party domain provider. Shopify simplifies the process by offering domain registration services directly through their platform. Here’s how you can register your domain through Shopify:
- Log in to your Shopify admin dashboard
- In the left-hand sidebar, click on “Online Store” and then “Domains”
- Click on the “Buy New Domain” button
- Enter your chosen domain name and click “Check availability”
- If the domain is available, click “Buy” to purchase the domain
- Follow the prompts to complete the registration process
If you prefer to use a third-party domain provider, you can still connect your domain to your Shopify store. To do this, you will need to update your domain settings to point to your Shopify store. Shopify provides step-by-step instructions on how to connect your domain from popular domain providers on their support website.
By following these steps, you can purchase a domain name for your Shopify store and take the first step towards launching your online business. Remember to choose a memorable and relevant domain name that reflects your brand, and consider registering the domain through Shopify for a seamless integration with your store.
Design Your Store
Once you have set up your Shopify store, it’s time to focus on designing it to make a lasting impression on your visitors. A well-designed store can enhance your brand’s identity, improve the user experience, and ultimately increase your sales. In this section, we’ll explore how to select the right theme, customize it to align with your brand, and add products and categories to your store.
Select A Theme
Choosing the perfect theme for your Shopify store is essential in creating a visually appealing and user-friendly website. With hundreds of themes to choose from, it can be overwhelming to find the one that best suits your brand and caters to your target audience. When selecting a theme, consider factors like layout, color scheme, typography, and overall aesthetics.
Shopify provides both free and paid themes, each offering their own unique features. Browse through the Shopify Theme Store and filter your options based on your preferences and requirements. Pay attention to customer reviews and ratings to gain insights into the theme’s performance and flexibility.
Remember, your theme must be responsive to ensure a seamless experience for users on different devices. Bold, engaging visuals, clear navigation, and easy-to-read text are key elements to look for when choosing a theme.
Customize The Theme
After you have selected a theme, the next step is to customize it to reflect your brand’s personality. Shopify’s built-in customization tools allow you to tailor your theme according to your specific requirements without any coding knowledge. From changing colors and fonts to adjusting layouts and adding your logo, you have the power to create a unique and cohesive brand identity.
Start by heading to the “Customize” section in your Shopify dashboard. Here, you can fine-tune the appearance of your homepage, product pages, and other important sections. Experiment with different color schemes that align with your branding guidelines, ensuring a visually appealing and harmonious look throughout your store.
- Upload your logo and choose the right dimensions to maintain its integrity.
- Customize your typography to create a consistent and easily readable font hierarchy.
- Experiment with different layouts to find the one that showcases your products in the most enticing way.
This customization process is an iterative one, so don’t be afraid to make changes and seek feedback from others to ensure your store reflects your brand’s vision.
Add Your Products And Create Categories
Now that your store’s design is taking shape, it’s time to populate it with your products. Start by organizing your products into relevant categories, making it easier for customers to navigate and find what they’re looking for. Creating categories not only improves the user experience but also helps with your store’s search engine optimization (SEO).
In your Shopify dashboard, navigate to the “Products” section and click on “Add product” to start adding your items. Ensure you provide clear and compelling product descriptions, high-quality images, and accurate pricing information. Optimize your product titles and descriptions with relevant keywords without compromising their readability.
As you add each product, assign it to the appropriate category to streamline your customers’ browsing experience. Categories can be created and managed under the “Collections” section. Consider creating subcategories or collections for further organization if needed.
Regularly review and update your products and categories to keep your store fresh and relevant to your customers’ needs. Continuously optimizing your product presentation and organization will help drive conversions and encourage repeat purchases.
Credit: ecommerce.folio3.com
Configure Your Settings
Welcome to the next essential step in launching your Shopify store – configuring your settings. This step is crucial to ensure that your store is ready for payments, shipping, taxes, and discounts. In this section, we will cover everything you need to know about setting up payment gateways, configuring shipping options, and enabling essential features like taxes and discounts.
Set Up Payment Gateways
Payment gateways are crucial for processing transactions on your Shopify store. To set up payment gateways, go to Settings in your Shopify admin, then click on Payments. Here, you can select from a wide range of payment providers, including Shopify Payments, PayPal, and Stripe. Ensure that you enable the payment methods that are preferred by your target audience.
Configure Shipping Options
Configuring shipping options is vital to provide a seamless experience for your customers. In the Settings section, navigate to Shipping and delivery to set up your shipping preferences. You can customize shipping rates based on weight, price, or destination. Additionally, you can offer free shipping or set specific shipping zones to expand your reach globally.
Enable Essential Features Like Taxes And Discounts
Enabling essential features such as taxes and discounts ensures that your store is compliant with regulations and offers attractive promotions. Go to Settings and select Taxes to configure tax settings according to your location and business requirements. To set up discounts and promotions, navigate to Discounts and create enticing offers to attract customers.
Launch Your Store
Launching your Shopify store is an exciting milestone in your journey as an online business owner. It’s the moment when all your hard work and preparation come together, and you unveil your products and brand to the world.
Double-check Everything
Before you officially launch your store, it’s crucial to double-check everything to ensure a smooth and successful launch. Pay attention to the following areas:
- Product Descriptions: Make sure your product descriptions are clear, concise, and highlight the benefits and features of each item.
- Pricing: Verify that your prices are accurate and competitive in the market. Consider factors such as cost, profit margins, and competitor pricing.
- Images: Check that all product images are high-quality, visually appealing, and properly formatted for optimal loading speed.
- Navigation: Test your website navigation to ensure that customers can easily find what they’re looking for. Check for broken links and optimize your menu structure.
- Payment and Shipping Settings: Review your payment and shipping settings to make sure they are correctly configured, and test the checkout process to ensure a seamless customer experience.
- Mobile Responsiveness: With the majority of online shoppers using mobile devices, it’s crucial to ensure your store is optimized for mobile browsing. Test the responsiveness of your website across different devices and screen sizes.
- SEO Optimization: Take the time to optimize your store for search engines. Pay attention to meta tags, URLs, headings, and keyword optimization throughout your store’s pages.
Announce Your Store Launch
Once you’ve double-checked everything and have full confidence in your store’s readiness, it’s time to announce your store launch to the world. Here are some effective strategies to create buzz and excitement:
- Social Media: Leverage the power of social media platforms to announce your store launch. Craft compelling posts and share enticing visuals to engage your audience.
- Email Marketing: Send an email blast to your existing customer base and subscribers, inviting them to visit your new store. Offer an exclusive discount or incentive to encourage them to make their first purchase.
- Press Release: Write a press release and distribute it to relevant media outlets and industry influencers. Highlight what makes your store unique and newsworthy.
- Influencer Collaborations: Partner with influencers or bloggers in your niche to generate excitement around your store launch. Offer them exclusive access to your products or collaborate on a creative campaign.
Monitor And Optimize Your Store
Your work doesn’t stop once your store is launched. In fact, it’s just the beginning. You need to continuously monitor and optimize your store to drive traffic, increase conversions, and provide an exceptional customer experience. Here are some key areas to focus on:
- Website Analytics: Use tools like Google Analytics to gain insights into your store’s performance. Monitor metrics such as website traffic, conversion rates, bounce rates, and customer behavior.
- Conversion Rate Optimization: Identify areas where visitors may be dropping off or experiencing difficulties during the buying process. Implement A/B testing and make data-driven changes to improve your conversion rates.
- Customer Feedback: Listen to your customers and gather feedback to understand their needs and pain points. Use this information to make improvements and provide a better shopping experience.
- SEO Monitoring: Regularly check your store’s search engine rankings, keyword performance, and backlink profile. Make adjustments to your SEO strategies to improve your store’s visibility in search results.
- Stay Updated: Keep up with industry trends, consumer behavior, and technology advancements. Adapt your store accordingly to stay competitive and meet the evolving needs of your target audience.
Credit: www.amazon.com
Frequently Asked Questions For How To Launch Shopify Store
Q: What Are The Benefits Of Launching A Shopify Store?
A: Launching a Shopify store allows you to easily create an online presence, sell products, and manage inventory. You’ll benefit from its user-friendly interface, secure payment options, and access to a wide range of themes and apps to customize your store.
Q: How Much Does It Cost To Launch A Shopify Store?
A: The cost of launching a Shopify store depends on the plan you choose. Prices start from $29 per month for the Basic plan and go up to $299 per month for the Advanced plan. Additional costs may include domain registration and app subscriptions.
Q: Can I Customize The Design Of My Shopify Store?
A: Yes, you can customize the design of your Shopify store. Shopify offers a wide range of themes to choose from, and you can further modify the theme’s layout, colors, and fonts to match your brand. Additionally, you can add custom CSS and HTML code for more advanced customization.
Q: How Do I Add Products To My Shopify Store?
A: Adding products to your Shopify store is easy. Simply go to the products section in your admin panel and click on “Add product. ” From there, you can enter product details such as title, description, price, and images. You can also organize products into categories and add variants like size or color.
Conclusion
Launching a Shopify store is an exciting and rewarding endeavor. By following these steps, you can set yourself up for success and create a strong online presence. With a strategic approach to marketing, design, and customer experience, your Shopify store can thrive in the competitive e-commerce landscape.
Let’s get started and make your Shopify store a thriving success!